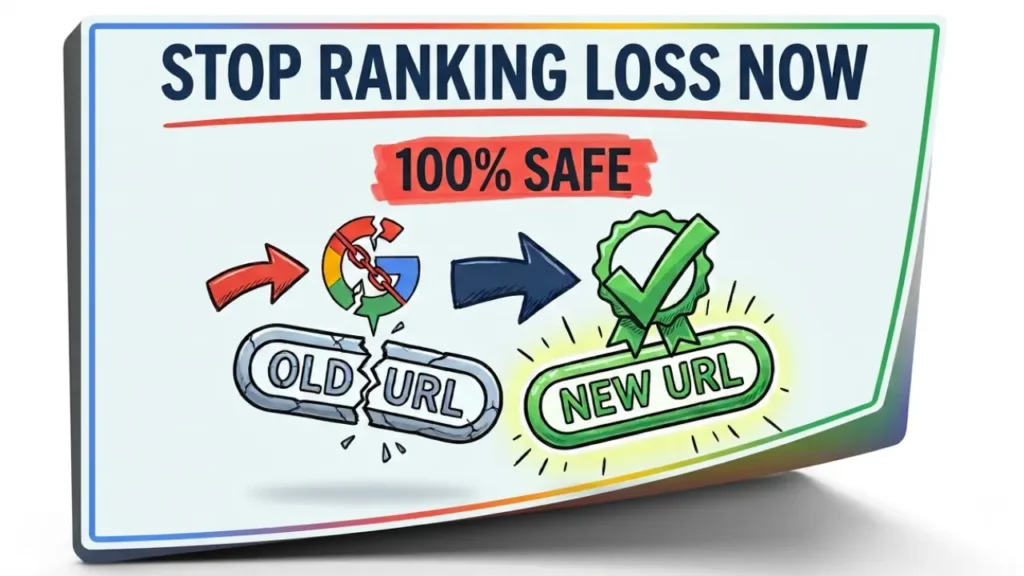

Learning how to change WordPress URL without losing rankings is essential if you need to update a published permalink without sacrificing the search visibility you’ve already earned. While changing a live URL can affect crawling and indexing, following the correct migration process allows search engines to understand that your content has permanently moved to a new address.
QUICK ANSWER :
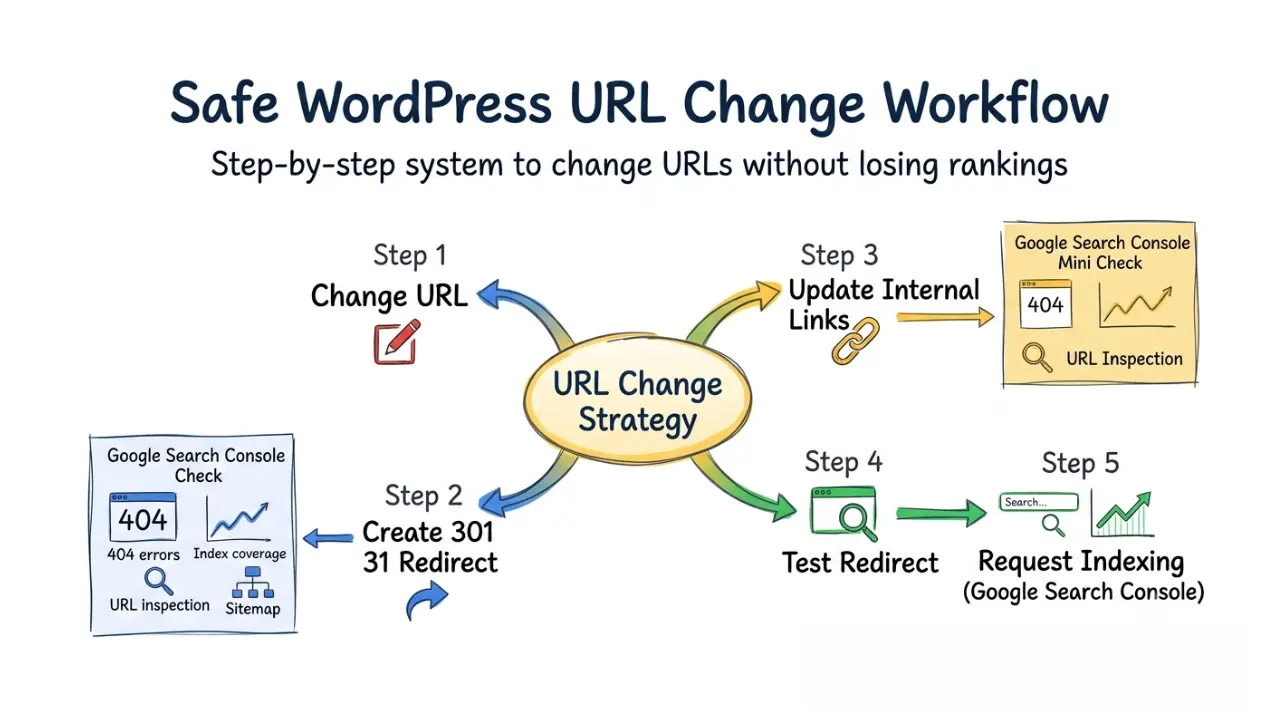
Yes, you can safely change a live WordPress URL without losing rankings by creating a permanent 301 redirect, updating any internal links that point to the old URL, and requesting Google to re-crawl the new page through Google Search Console. These steps help search engines transfer your page’s existing ranking signals to the new URL while minimizing disruption to organic traffic.
The safest way to change a published WordPress URL is to immediately implement a server-side 301 redirect from the old permalink to the new one. This permanent redirect tells search engines and browsers that the page has moved, helping preserve existing SEO value and ensuring visitors automatically reach the correct destination.
If you’re configuring permalink settings on a newly launched website, review The ultimate WordPress launch checklist before making structural URL changes to ensure your site’s foundation is properly configured from the beginning.
I think, Before changing blog post url after publishing wordpress, it’s important to understand that a URL change should only be made when there is a clear reason, such as improving readability, correcting an inaccurate slug, organizing site structure, or creating a more descriptive permalink. Changing URLs without a plan can create unnecessary crawl issues, broken links, and indexing delays.
To protect both traditional search engines and modern AI answer engines, follow these three essential steps:
- Create a permanent 301 redirect from the old URL to the new URL so search engines recognize the page has permanently moved.
- Update internal links manually to point directly to the new URL, reducing unnecessary redirect chains and improving crawl efficiency.
- Request a re-crawl in Google Search Console so Google can discover the updated URL, process the redirect, and refresh its index more quickly.
The rest of this guide explains what happens if I change a blog post URL, how to 301 redirect a page in WordPress, and how to do a 301 redirect using rank math, along with the best practices for preserving rankings throughout the entire process.
What happens if I change a blog post URL?
Changing a published blog post URL can temporarily affect its search visibility unless you immediately create a permanent 301 redirect from the old URL to the new one.
Search engines treat every URL as a unique location for a piece of content. When that address changes, they must discover the new URL, process the redirect, and update their index before the page’s ranking signals can be consolidated.
Changing blog post URL after publishing WordPress : The immediate effects
Changing blog post URL after publishing WordPress without a redirect can create broken links, crawl errors, and indexing delays until search engines process the new URL.
While the content itself remains unchanged, its web address changes, meaning both search engines and users must be guided to the new location through a permanent redirect.
If the transition is not handled correctly, Google may temporarily treat the old URL as missing while it evaluates the replacement. This can reduce organic visibility, create unnecessary crawl issues, and delay the transfer of existing ranking signals.
Breaking a live URL without a proper migration plan can also create indexing problems similar to those explained in Why is my new WordPress site not indexing on Google? (The GSC fixes you need).
Now I will list down the most common risks of changing a live blog post URL include:
01 . Loss of existing ranking signals
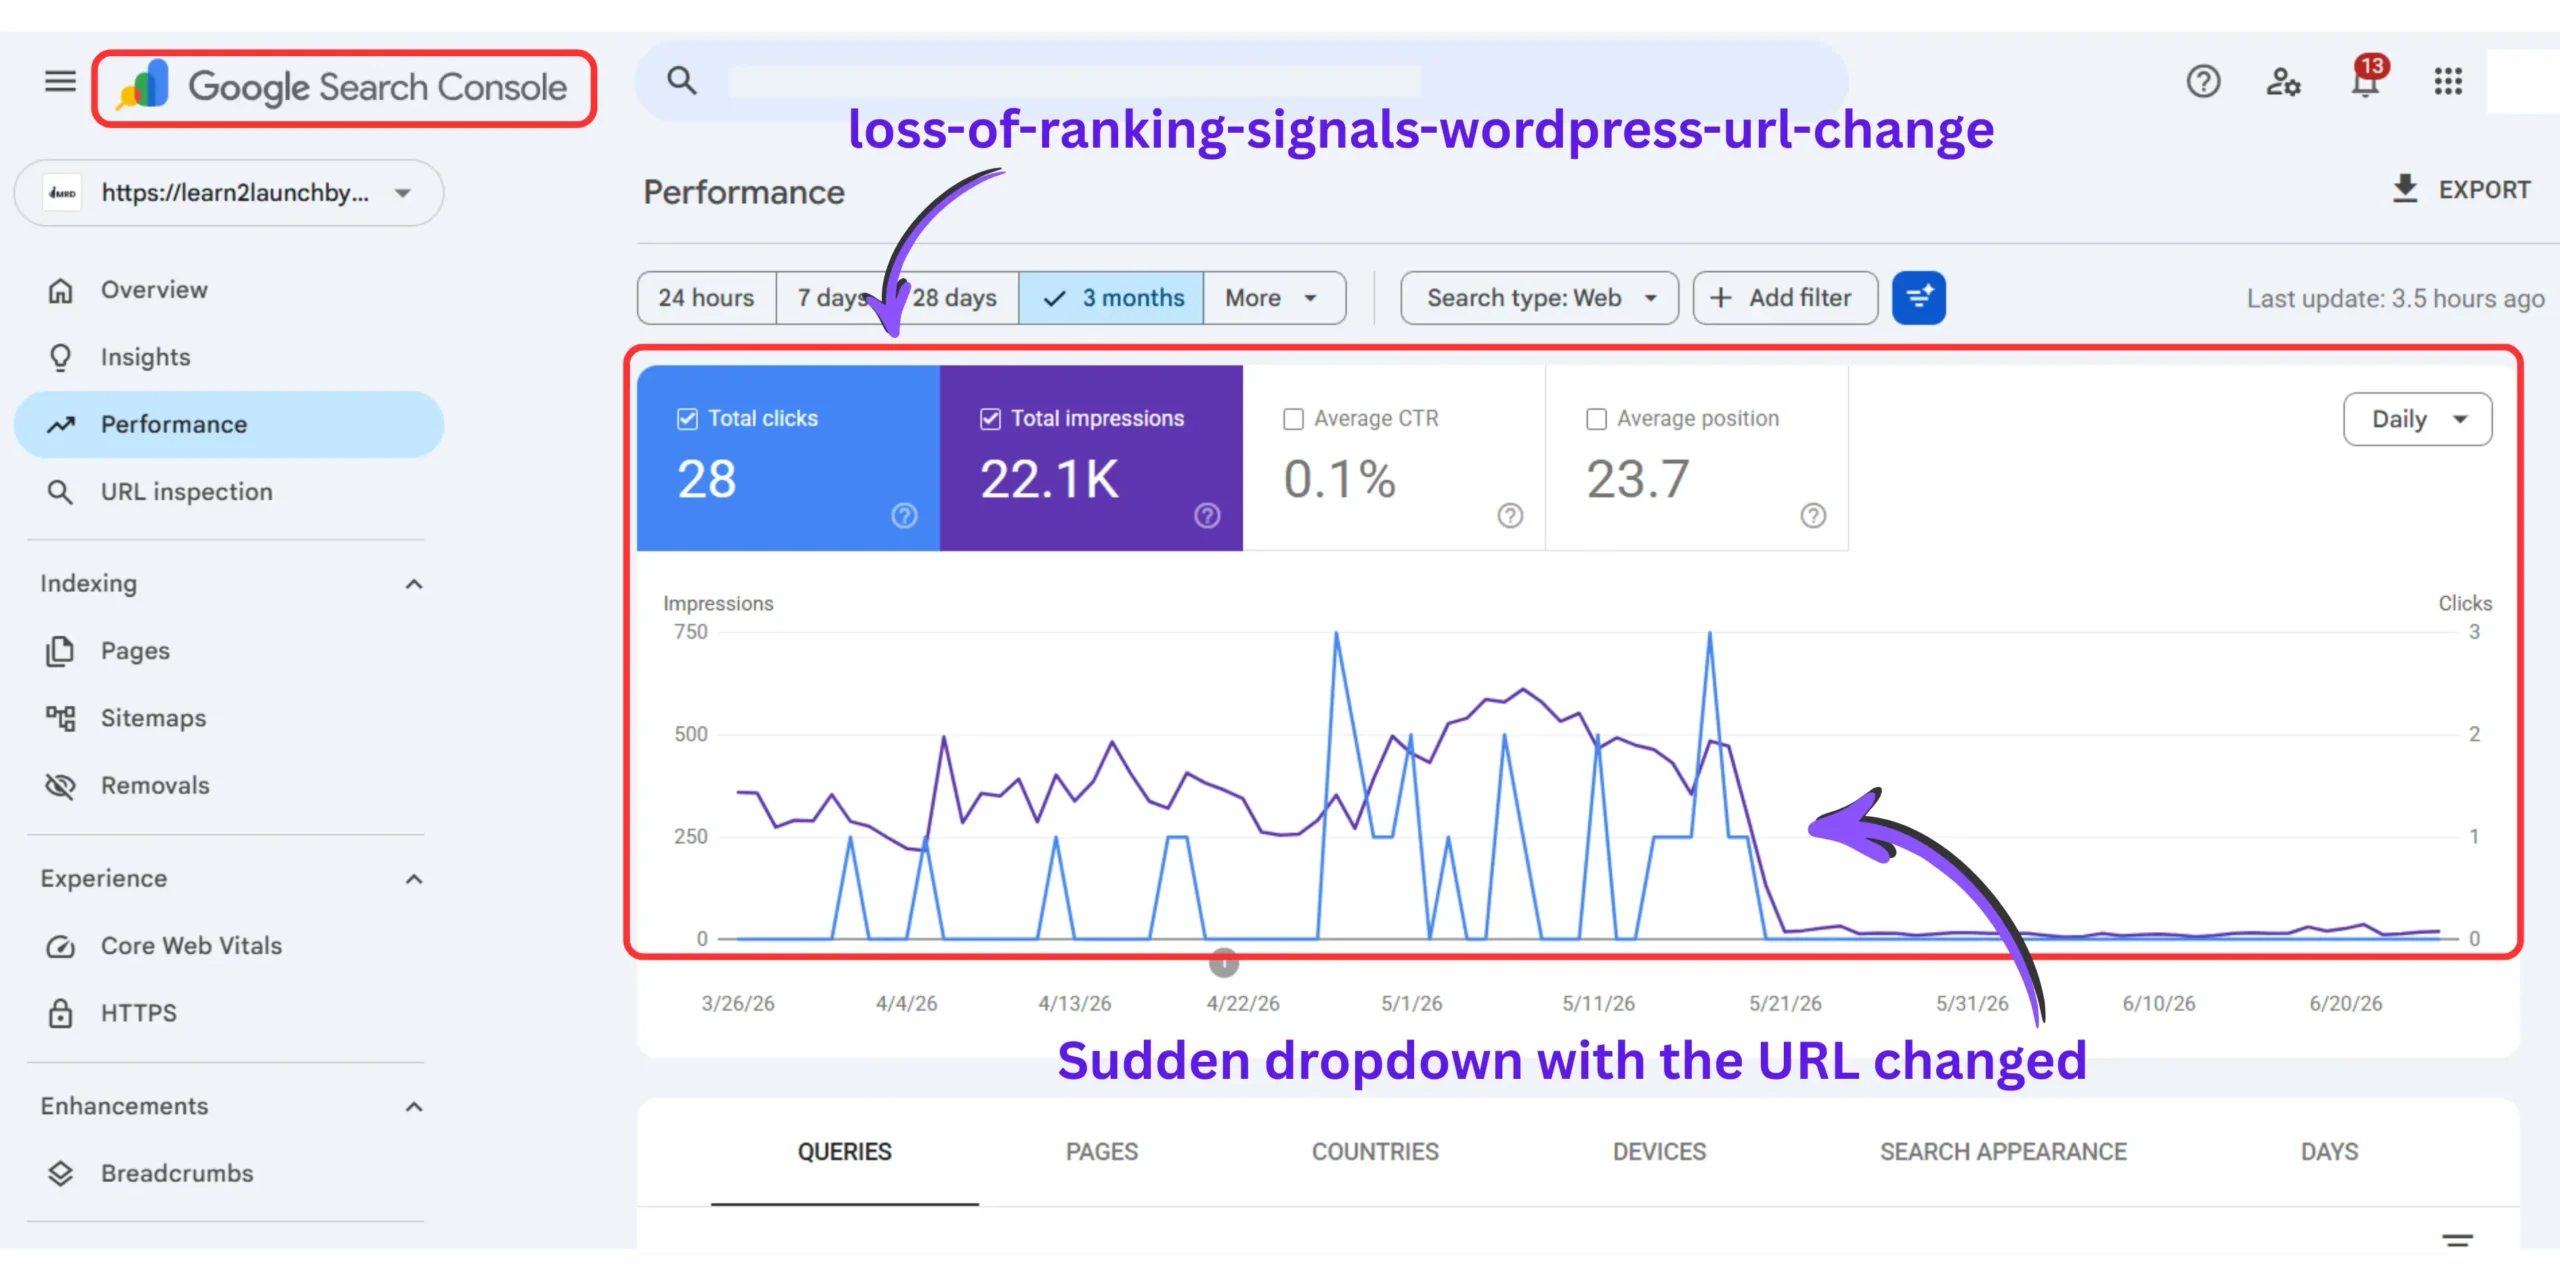
A published URL can lose part of its accumulated ranking signals if search engines cannot correctly associate the old URL with the new one.
External backlinks, historical engagement signals, and crawl history are connected to the original address. A properly configured 301 redirect helps search engines transfer those signals instead of treating the new URL as an entirely separate page.
02 . Visitors encountering 404 errors
Visitors will reach a 404 error page if the old URL is removed without a redirect. Users arriving through bookmarks, social media posts, email newsletters, or older search results will be unable to access the content, creating a poor user experience and potentially increasing bounce rates.
03 . Delayed crawling and reindexing
Search engines require time to discover, crawl, and index the new URL after a permalink change. During this transition, rankings may fluctuate until Google confirms the permanent redirect and updates its search index. Requesting reindexing through Google Search Console can help speed up this process.
04 . The limitations of WordPress wp_old_slug
WordPress automatically stores previous post slugs in the _wp_old_slug database field for some permalink changes, but it should not replace a proper 301 redirect strategy.
This built-in feature can redirect certain old slugs to the updated URL, but it is designed as a convenience feature rather than a comprehensive SEO migration solution. It does not replace server-side redirects, does not cover every URL change scenario, and should not be relied upon as the primary method for protecting rankings on a production website.
How to 301 redirect a page in WordPress
You can create a 301 redirect in WordPress by using an SEO plugin, a dedicated redirection plugin, or a server-level redirect rule.
A permanent (301) redirect automatically sends both visitors and search engines from the old URL to the new one, helping preserve existing ranking signals while preventing 404 errors.
For most WordPress users, a plugin-based redirect is the safest and easiest option because it requires no manual server configuration and can be managed directly from the WordPress dashboard.
Managing redirects is only one part of maintaining a healthy SEO setup. Before making structural changes to a live website, review Don’t launch your WordPress website without these 10 WordPress plugins to ensure your essential SEO and maintenance tools are already in place.
How to do 301 Redirect using Rank Math
Rank Math allows you to create a permanent 301 redirect after changing a WordPress URL, helping search engines and visitors automatically reach the updated page. If the Redirections module is enabled, you can create a redirect in just a few steps.
Step 01 : Change the live WordPress URL slug
Begin by updating the permalink of the published post or page.
- Open the post or page inside the WordPress editor.
- Locate the Permalink or URL Slug setting.
- Replace the existing slug with your new SEO-friendly URL.
- Click Update to save the changes.
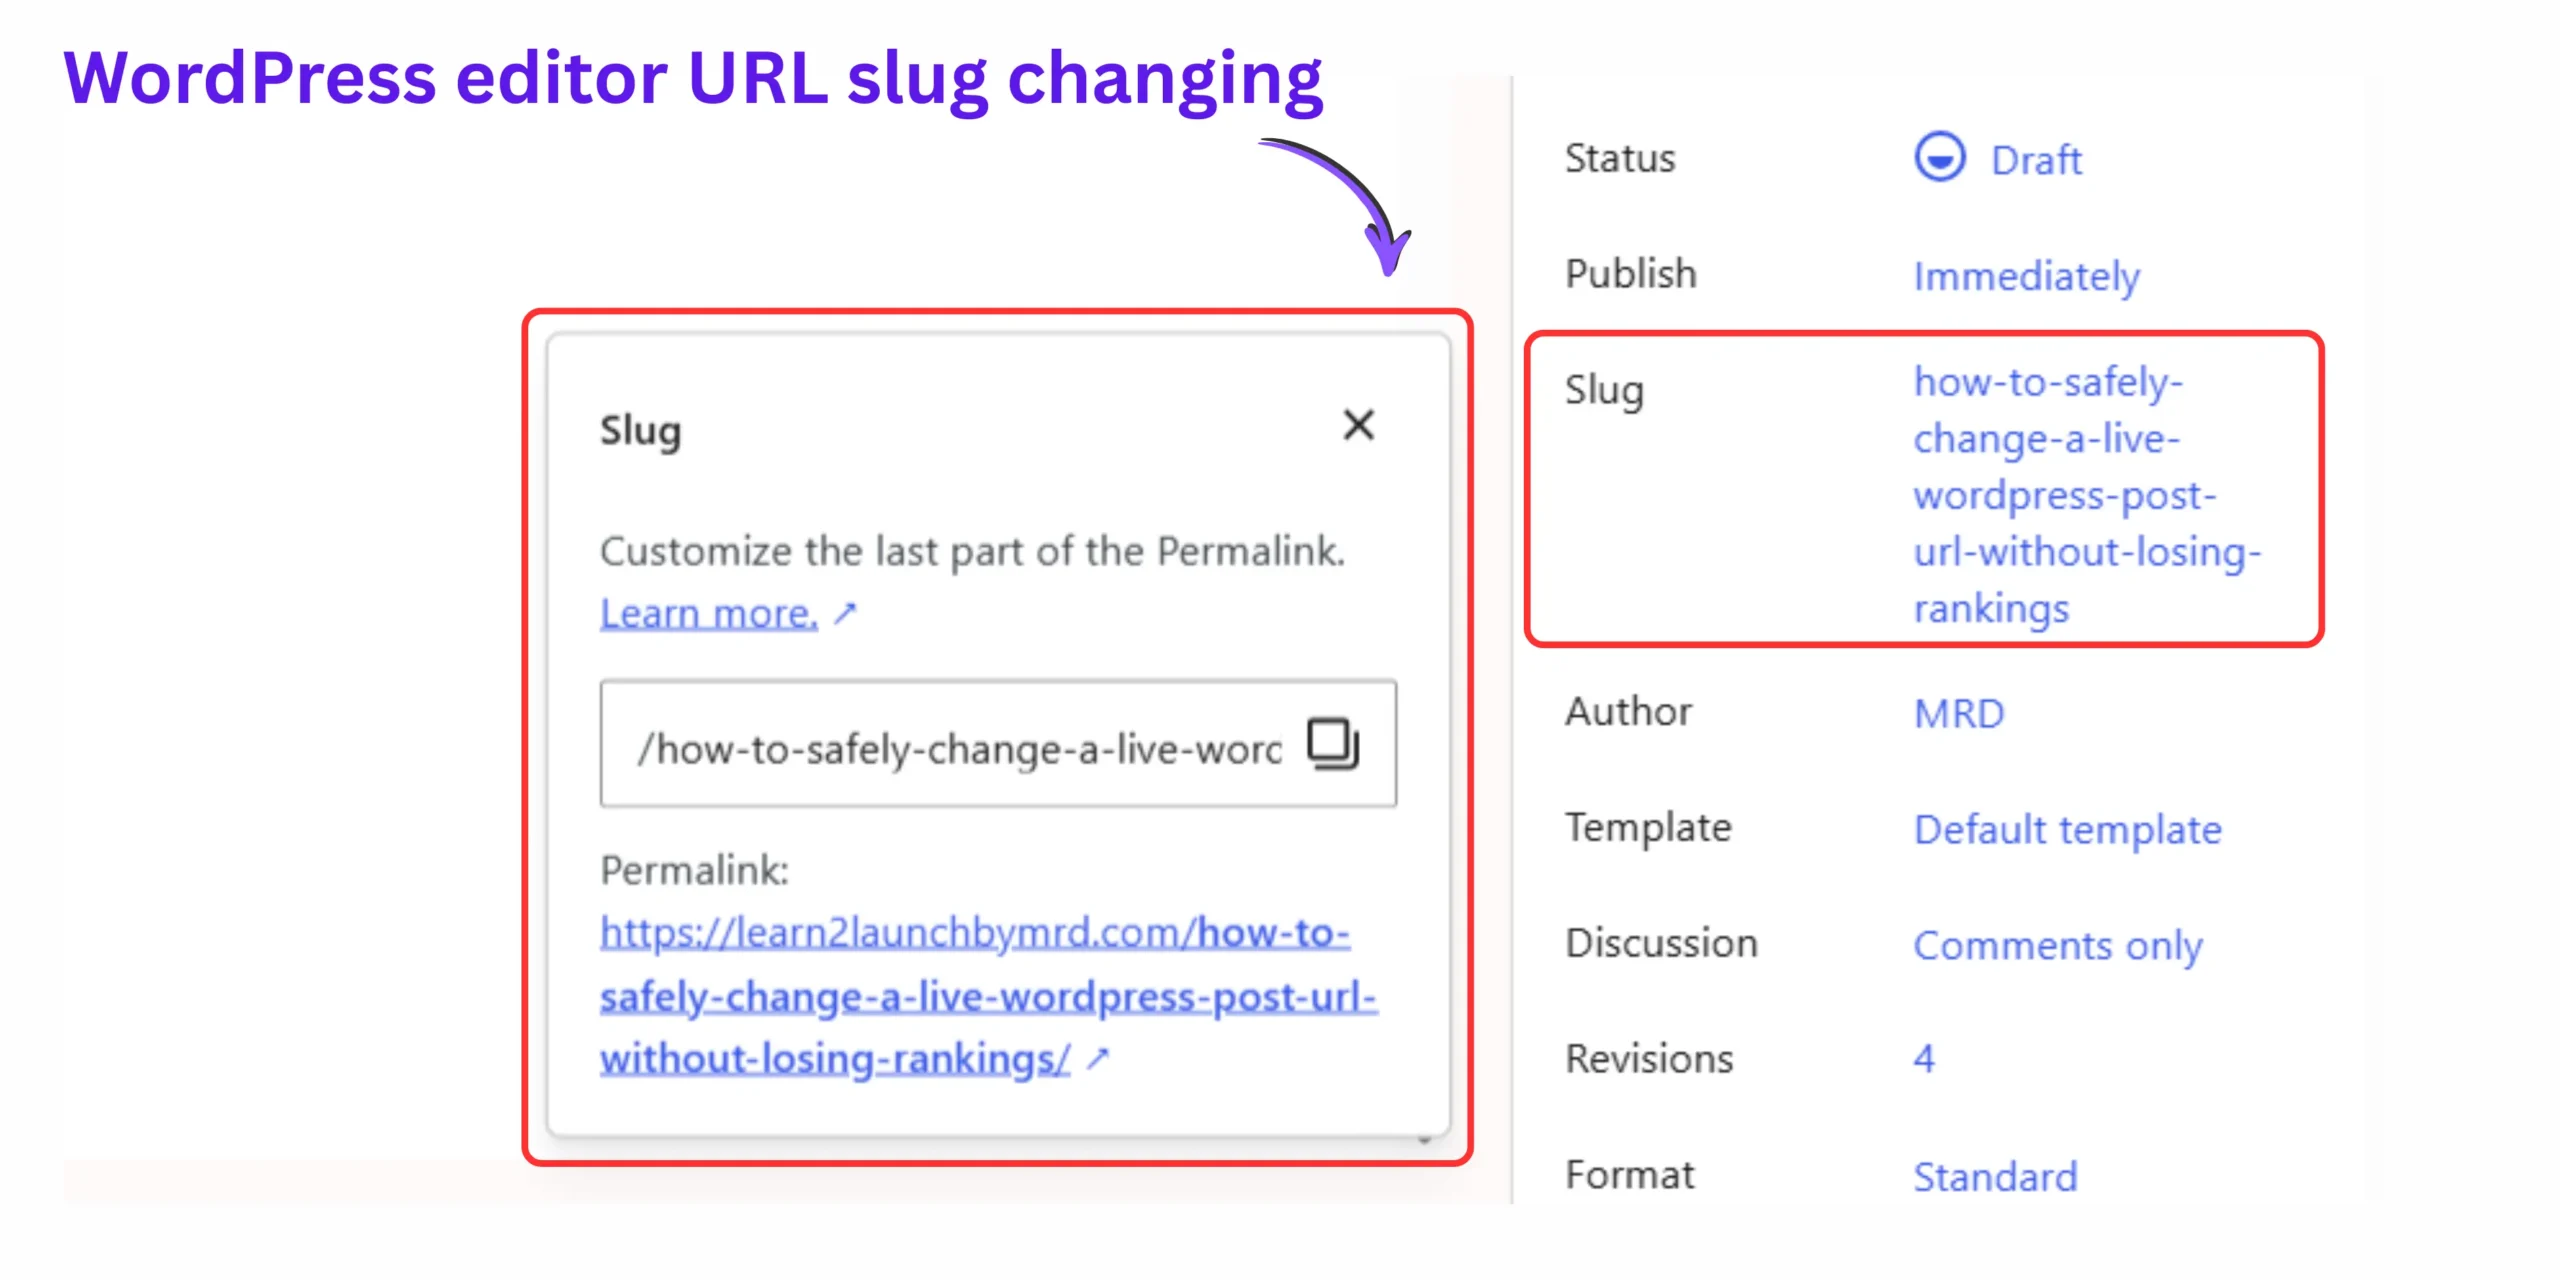
At this point, the old URL no longer serves the content, so a permanent redirect should be created immediately.
Step 02 : Open the Rank Math redirections dashboard
Navigate to the Rank Math Redirections panel to create a new redirect rule.
- From the WordPress dashboard, go to Rank Math → Redirections.
- Click Add New to create a new redirect.
Step 03 : Configure the redirect
Map the old URL directly to the new URL using a 301 Permanent Redirect.
Complete the redirect form as follows:
- Source URL: Enter the original URL or slug.
- Destination URL: Enter the new page URL.
- Redirection Type: Select 301 Permanent Move.
This tells search engines that the page has permanently moved to a new location.
Step 04 : Save the redirect and test it
Save the redirect and verify that the old URL automatically opens the new page.
After clicking Add Redirection:
- Clear your website cache if you’re using a caching plugin.
- Open the old URL in an incognito browser window.
- Confirm that it automatically redirects to the updated URL.
- Optionally, verify the redirect using an HTTP status checker to ensure the server returns a 301 response.
Testing the redirect helps identify configuration issues before search engines recrawl the page.
Free redirection plugin WordPress tutorial (alternative method)
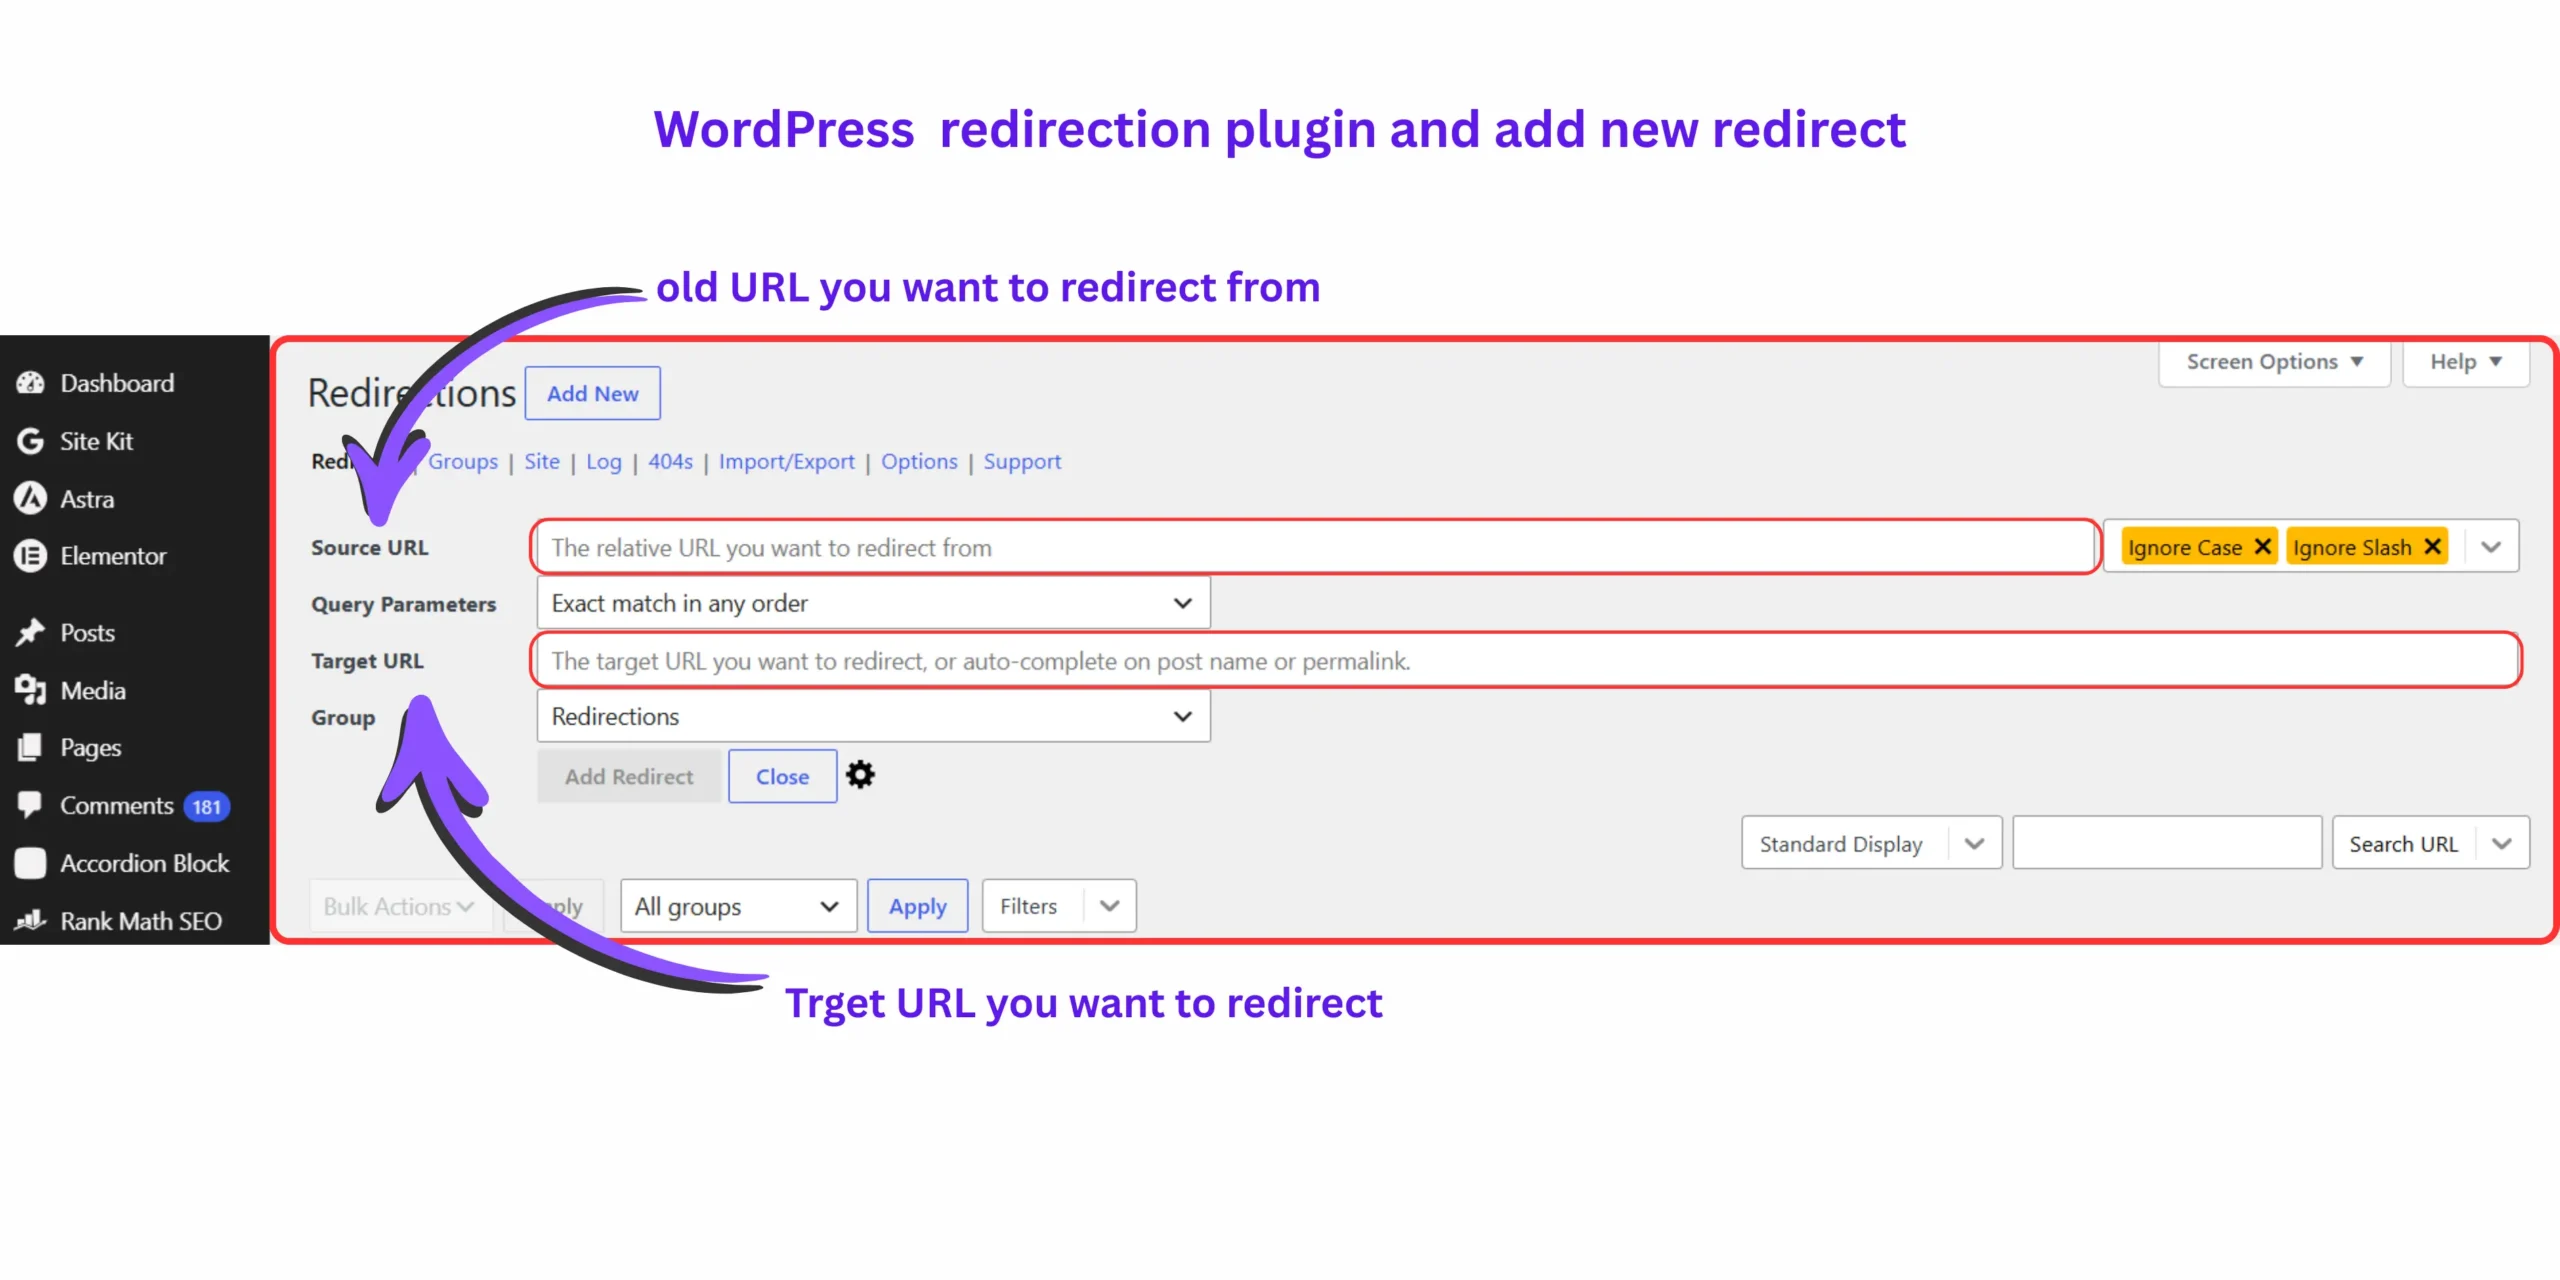
The free Redirection plugin is a reliable alternative for creating 301 redirects if you are not using Rank Math.
It allows you to manage redirects without editing server configuration files and is suitable for most WordPress websites. After installing and activating the plugin:
- Navigate to Tools → Redirection.
- Select Add New.
- Enter the old page URL in the Source URL field.
- Enter the updated page URL in the Target URL field.
- Leave the default matching settings unless you have a specific requirement.
- Click Add Redirect to save the rule.
Once the redirect has been created, test the original URL to confirm that visitors and search engines are automatically sent to the new destination.
How to update internal links after changing URL WordPress
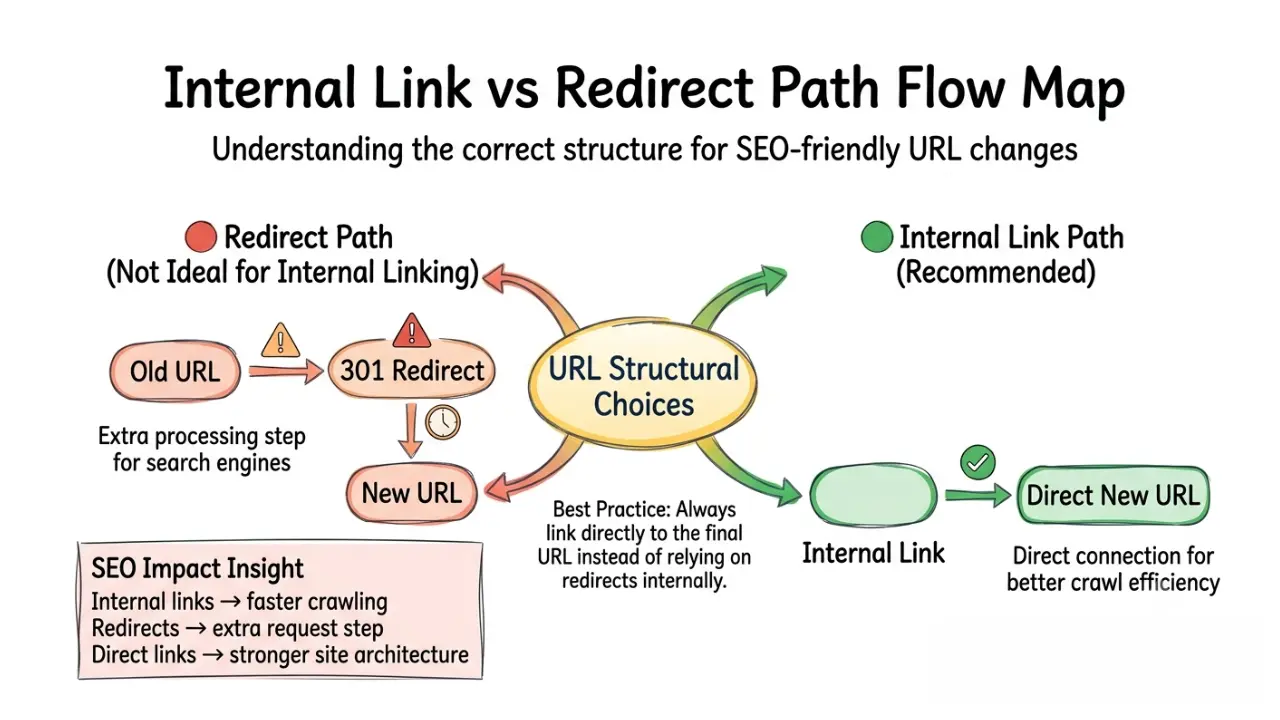
You should update every internal link that points to the old URL after changing a WordPress permalink, even if a 301 redirect is already in place.
Direct internal links help search engines crawl your website more efficiently, reduce unnecessary redirect requests, and ensure visitors always reach the correct page without relying on an intermediate redirect.
A 301 redirect is designed to preserve access to the updated page, but it should be treated as a migration tool rather than a permanent substitute for clean internal linking. Updating your internal links creates a stronger site architecture and helps search engines understand the relationship between your content more clearly.
Maintaining accurate internal linking is also an important part of on-page optimization. Learn how to build stronger contextual links by following How to do on-page SEO for blog posts.
Why updating internal links matters
Direct internal links provide a better user experience and a cleaner crawl path than links that first pass through a redirect. Although search engines can follow a 301 redirect, linking directly to the final destination eliminates unnecessary processing and keeps your website structure easier to maintain over time.
As I know, Updating internal links also helps you:
- Improve crawl efficiency by removing unnecessary redirect steps.
- Keep your site’s internal link structure accurate and up to date.
- Reduce the risk of broken links if redirects are accidentally removed in the future.
- Make it easier to manage your website as your content library grows.
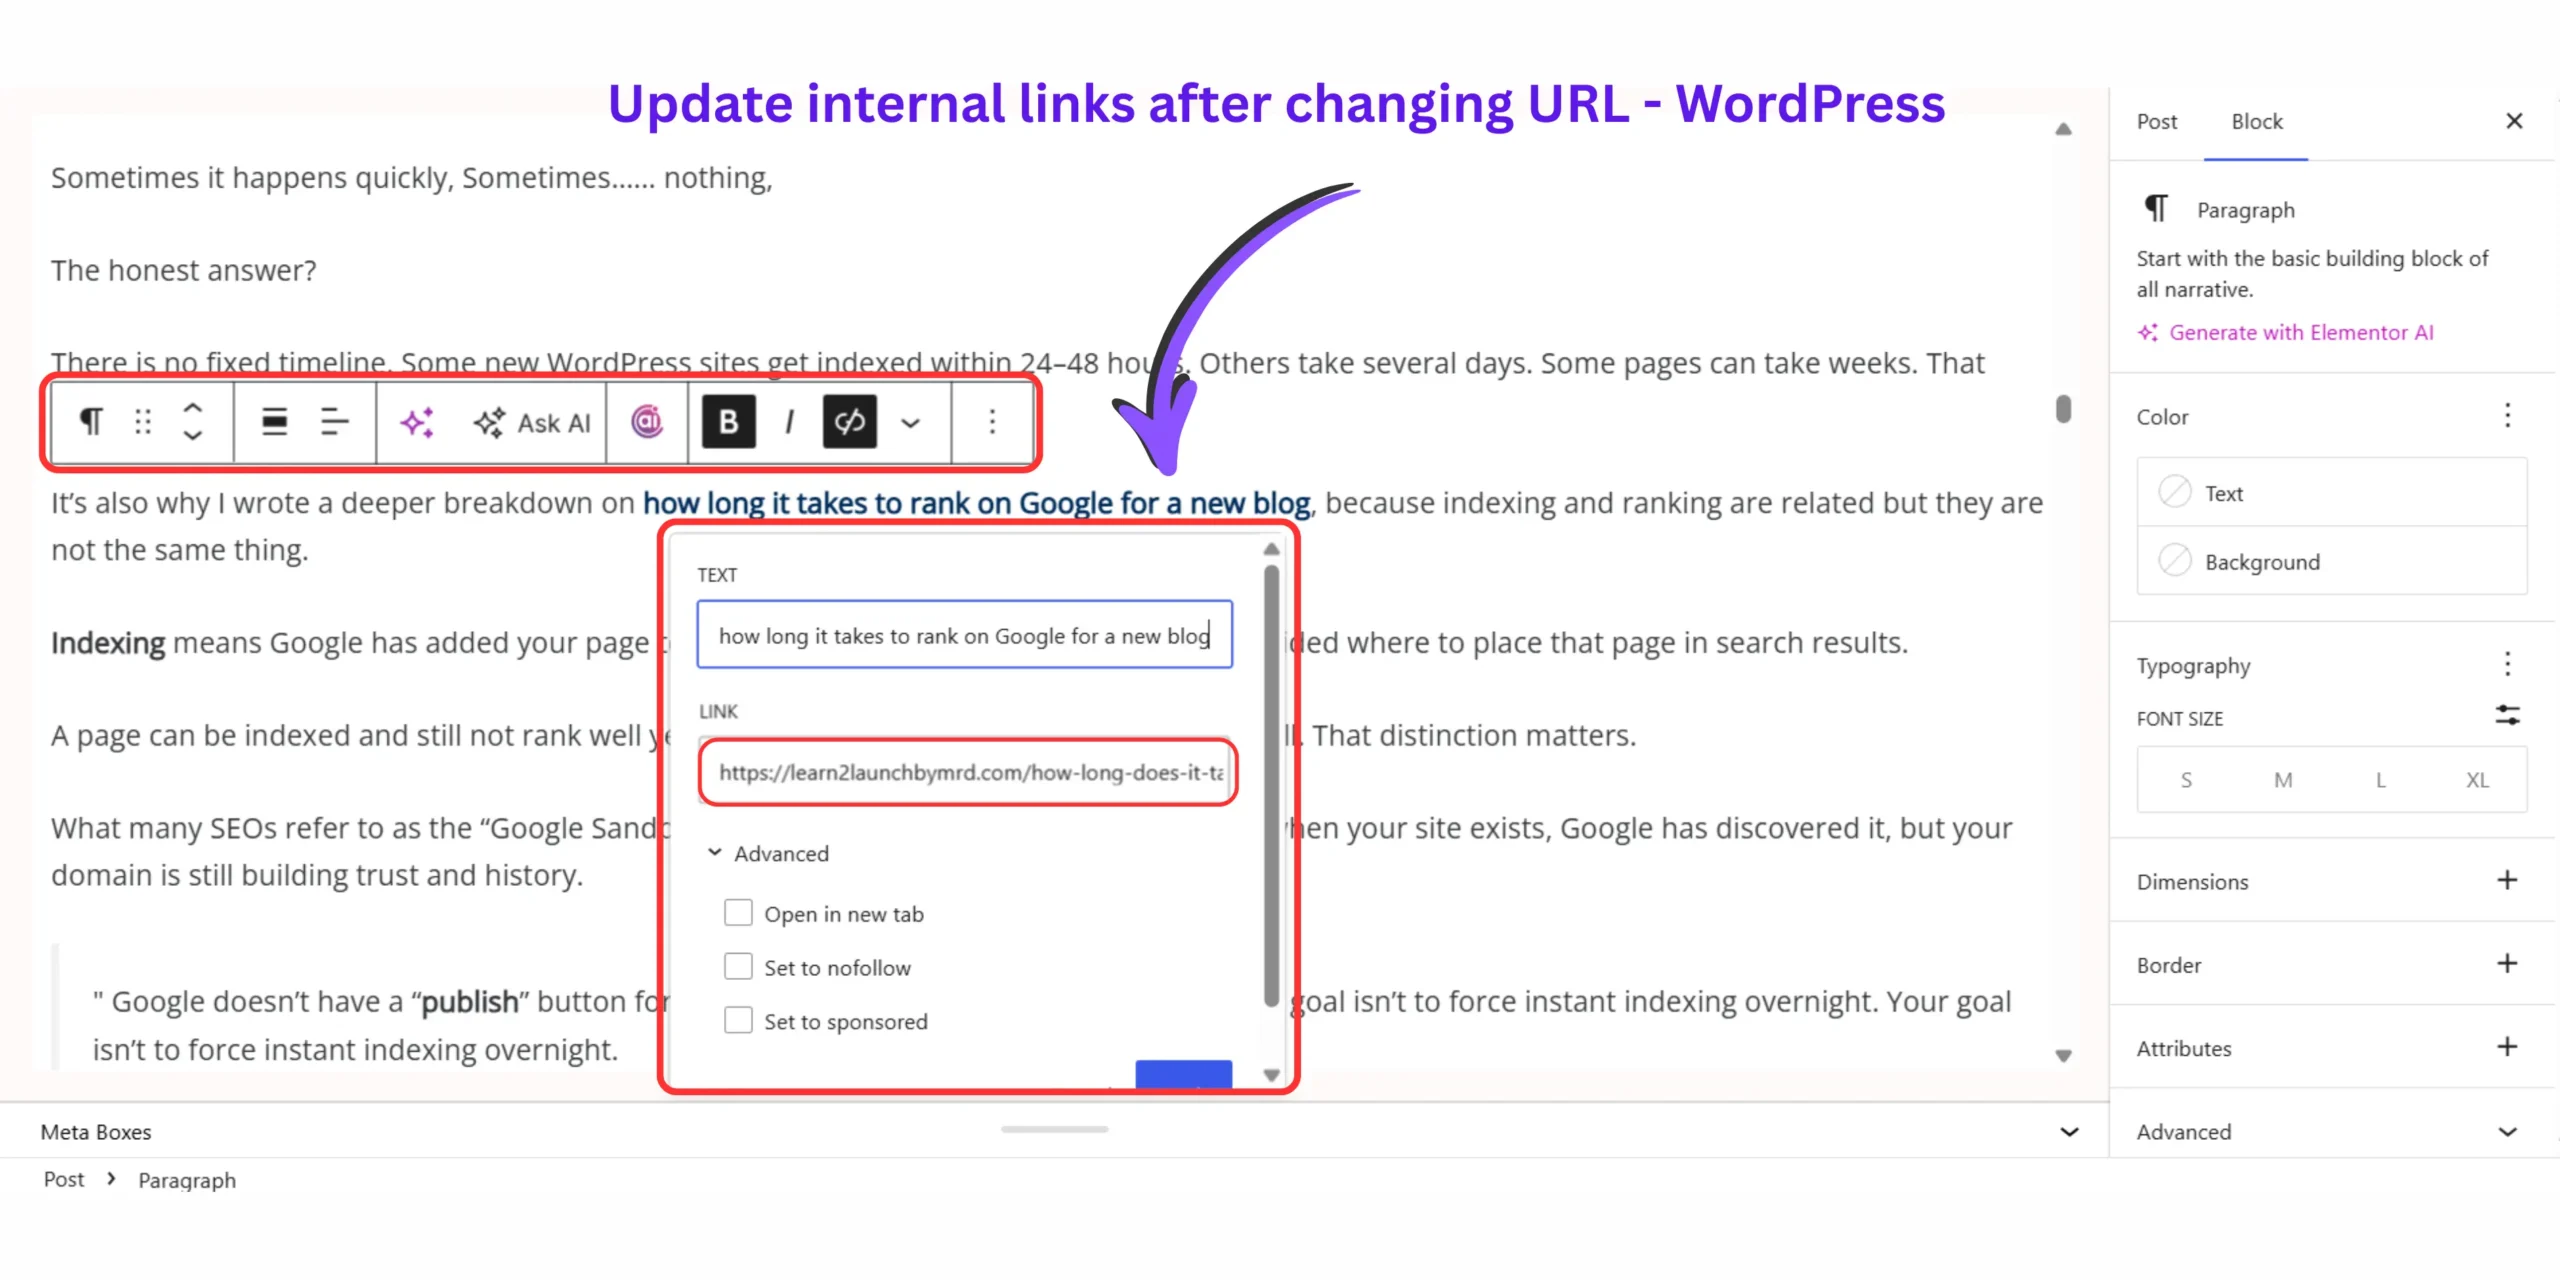
How to update internal links across your website
The safest way to update internal links is to locate every reference to the old URL, replace it with the new URL, and verify that all important pages point directly to the updated destination.
Step 01 : Find every internal link using old URL
Start by identifying every page that still links to the previous permalink.
I will show you how You can do this by:
- Crawling your website with an SEO auditing tool.
- Searching your WordPress database using a plugin such as Better Search Replace.
- Searching directly within your WordPress content if only a few pages are affected.
Creating a complete list prevents outdated links from being overlooked.
Step 02 : Replace the old URL with the new URL
Update every internal reference so it points directly to the new permalink instead of relying on the redirect.
If your old URL appears in multiple posts or pages, a search-and-replace plugin can safely update them in bulk. Before making large-scale database changes, create a full website backup to ensure you can restore your content if necessary.
Step 03 : Verify your internal links
Check that your updated links open the new URL directly without passing through the old address.
Pay your special attention to:
- Navigation menus
- Category pages
- Related post sections
- High traffic blog posts
- Pillar pages and topic clusters
Finally, test a selection of updated links to confirm they open the correct destination and that no unnecessary redirect chain exists.
How to check 404 errors in Google Search Console after URL change
After changing a WordPress URL, you should verify that Google recognizes the new page and that the old URL is redirecting correctly instead of returning a 404 error.
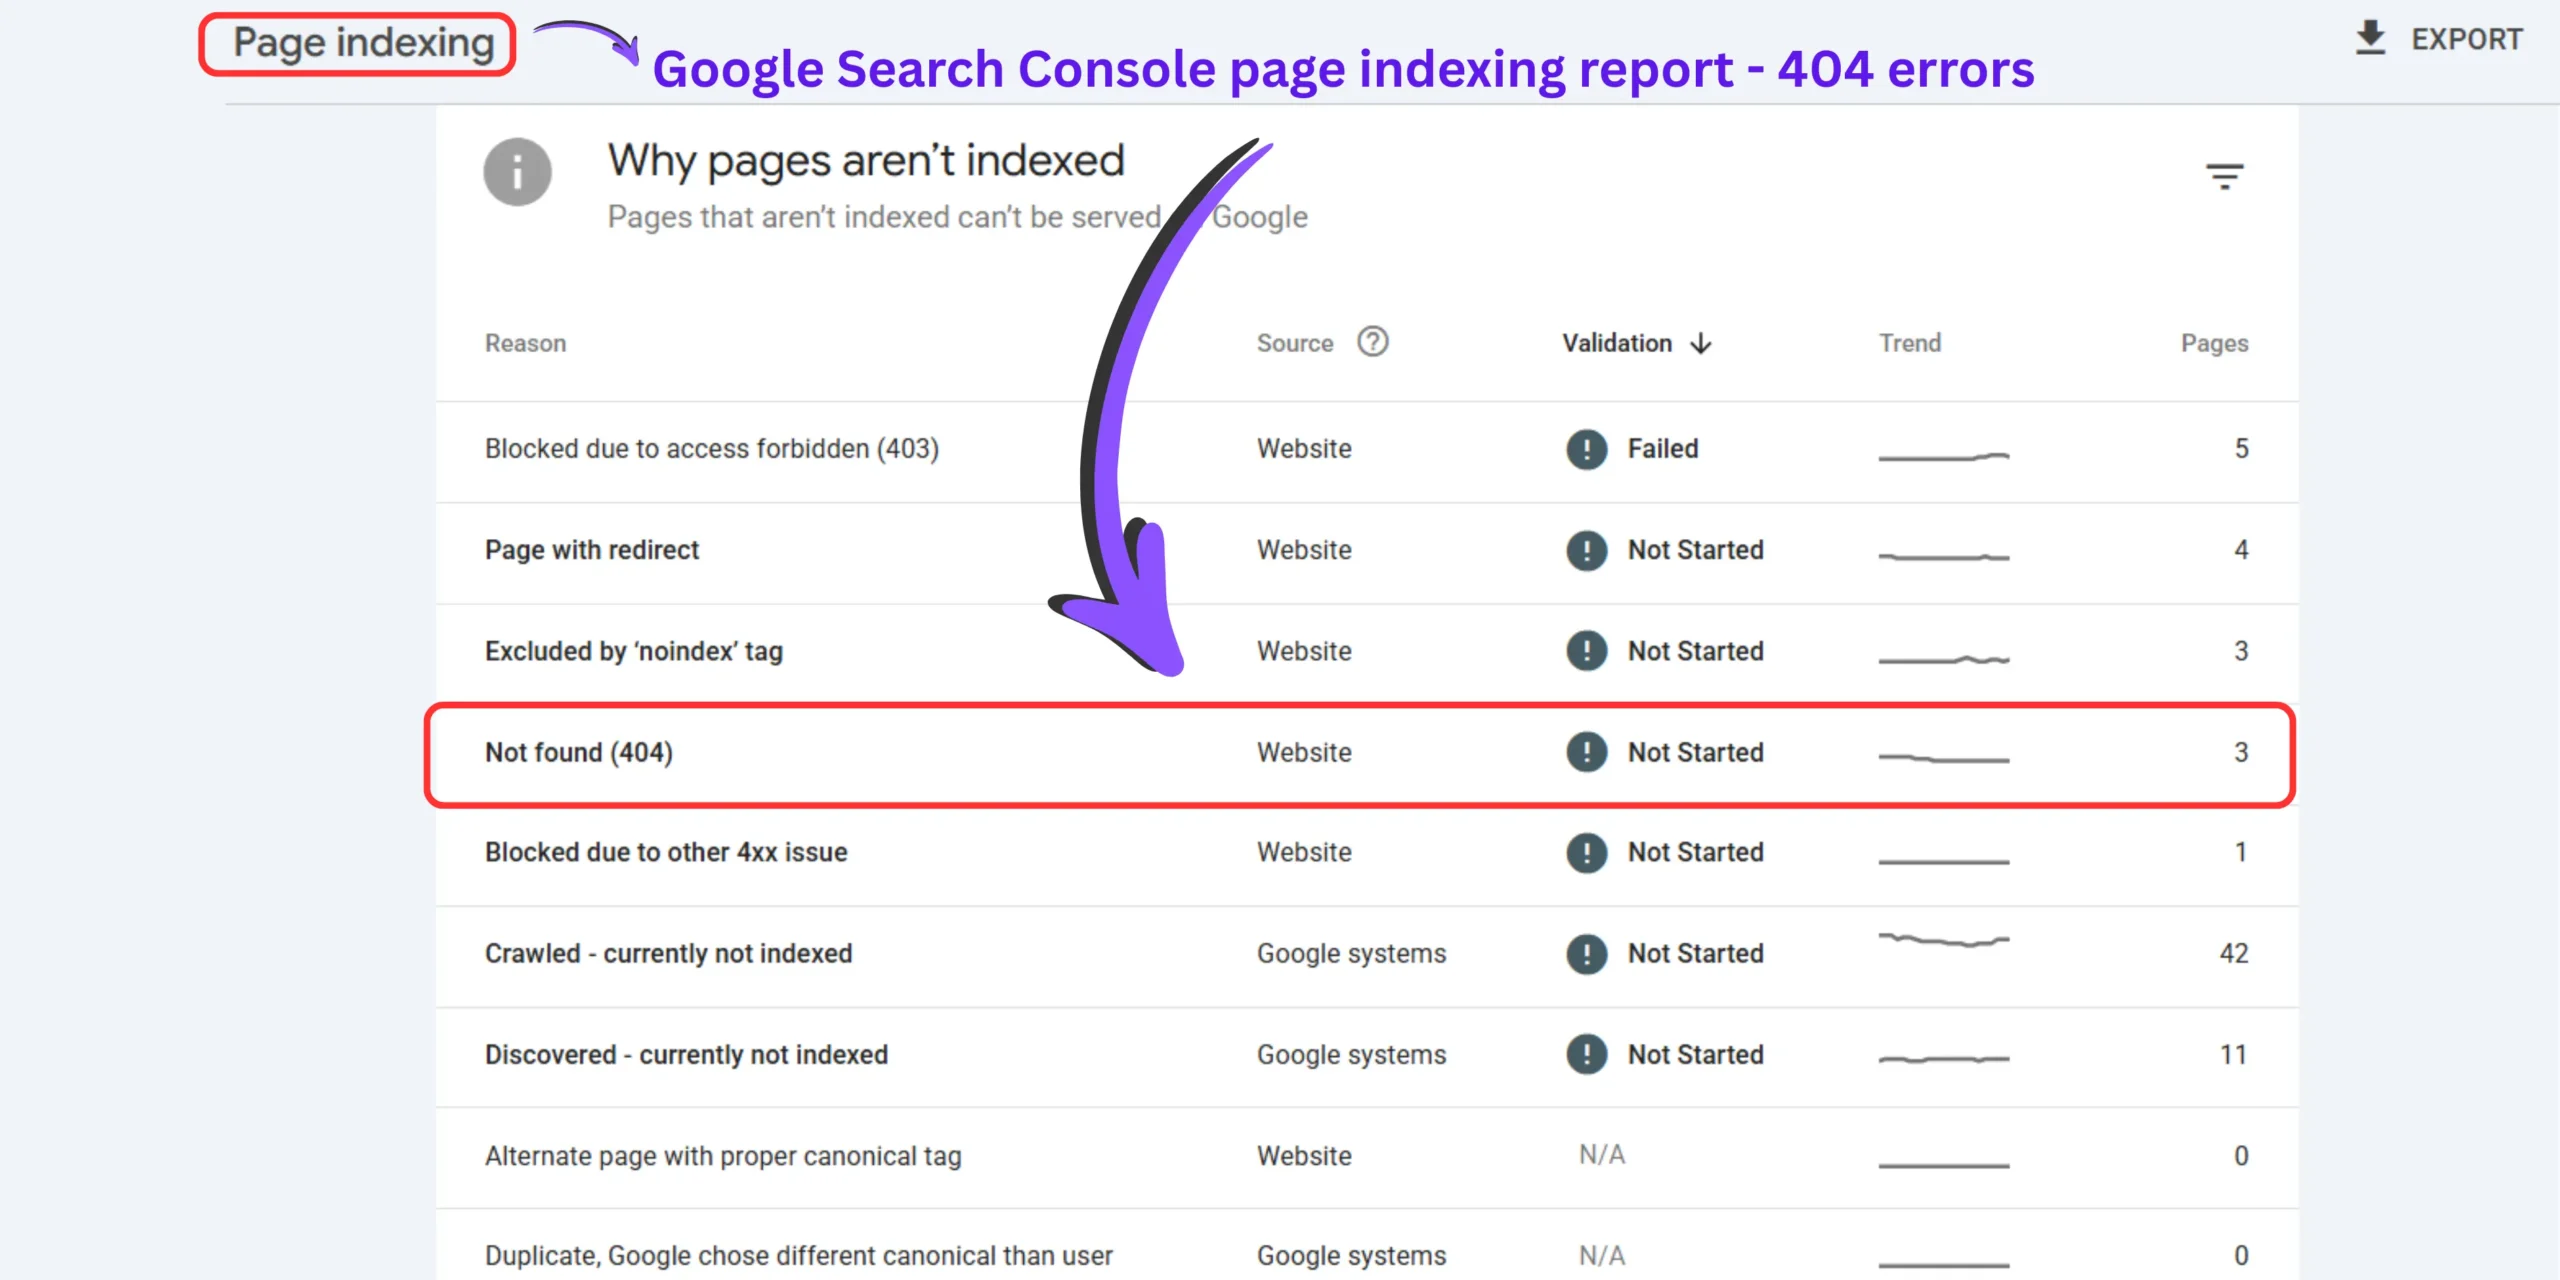
Checking Google Search Console helps you confirm that search engines are processing your URL change as expected and allows you to identify indexing problems before they affect long-term search visibility.
Google may take several days to recrawl the old URL and update its index, so monitoring Search Console during this period helps you track the migration and resolve any issues quickly.
If you notice unexpected indexing warnings or pages that fail to appear in Google’s index, follow the troubleshooting steps explained in Why is my new WordPress site not indexing on Google to diagnose common crawling and indexing problems.
How to verify your URL change in Google Search Console
The easiest way to verify a successful URL change is to check both the Pages report and the URL Inspection tool inside Google Search Console. Together, these reports help you identify broken redirects, unexpected 404 errors, and indexing delays.
Step 01 : Check the pages report
Review the Pages report to identify URLs that Google cannot access or index correctly.
Inside Google Search Console:
- Open Indexing → Pages.
- Scroll to the Why pages aren’t indexed section.
- Look for entries marked Not found (404).
- Confirm that your old URL is not incorrectly listed because of a missing redirect.
If the old URL appears as a 404 when it should redirect to the new page, review your redirect configuration immediately.
Step 02 : Inspect the old URL
Use the URL Inspection tool to confirm that Google can follow the redirect from the old URL to the new one.
Paste the original URL into the URL Inspection search bar. During the inspection, verify that :
- Google can access the URL.
- The redirect is detected correctly.
- The destination page is the updated URL.
- No unexpected crawl or indexing errors are reported.
This confirms that Google understands the page has permanently moved.
Step 03 : Inspect the new URL
Verify that the new URL is eligible for indexing and request reindexing if necessary.
Inspect the updated URL and check that:
- The page is accessible.
- Google can crawl the page successfully.
- There are no indexing errors.
- The page is eligible to appear in Google Search.
If the page has not yet been crawled, click Request Indexing to ask Google to prioritize a fresh crawl.
What to do if you find 404 errors
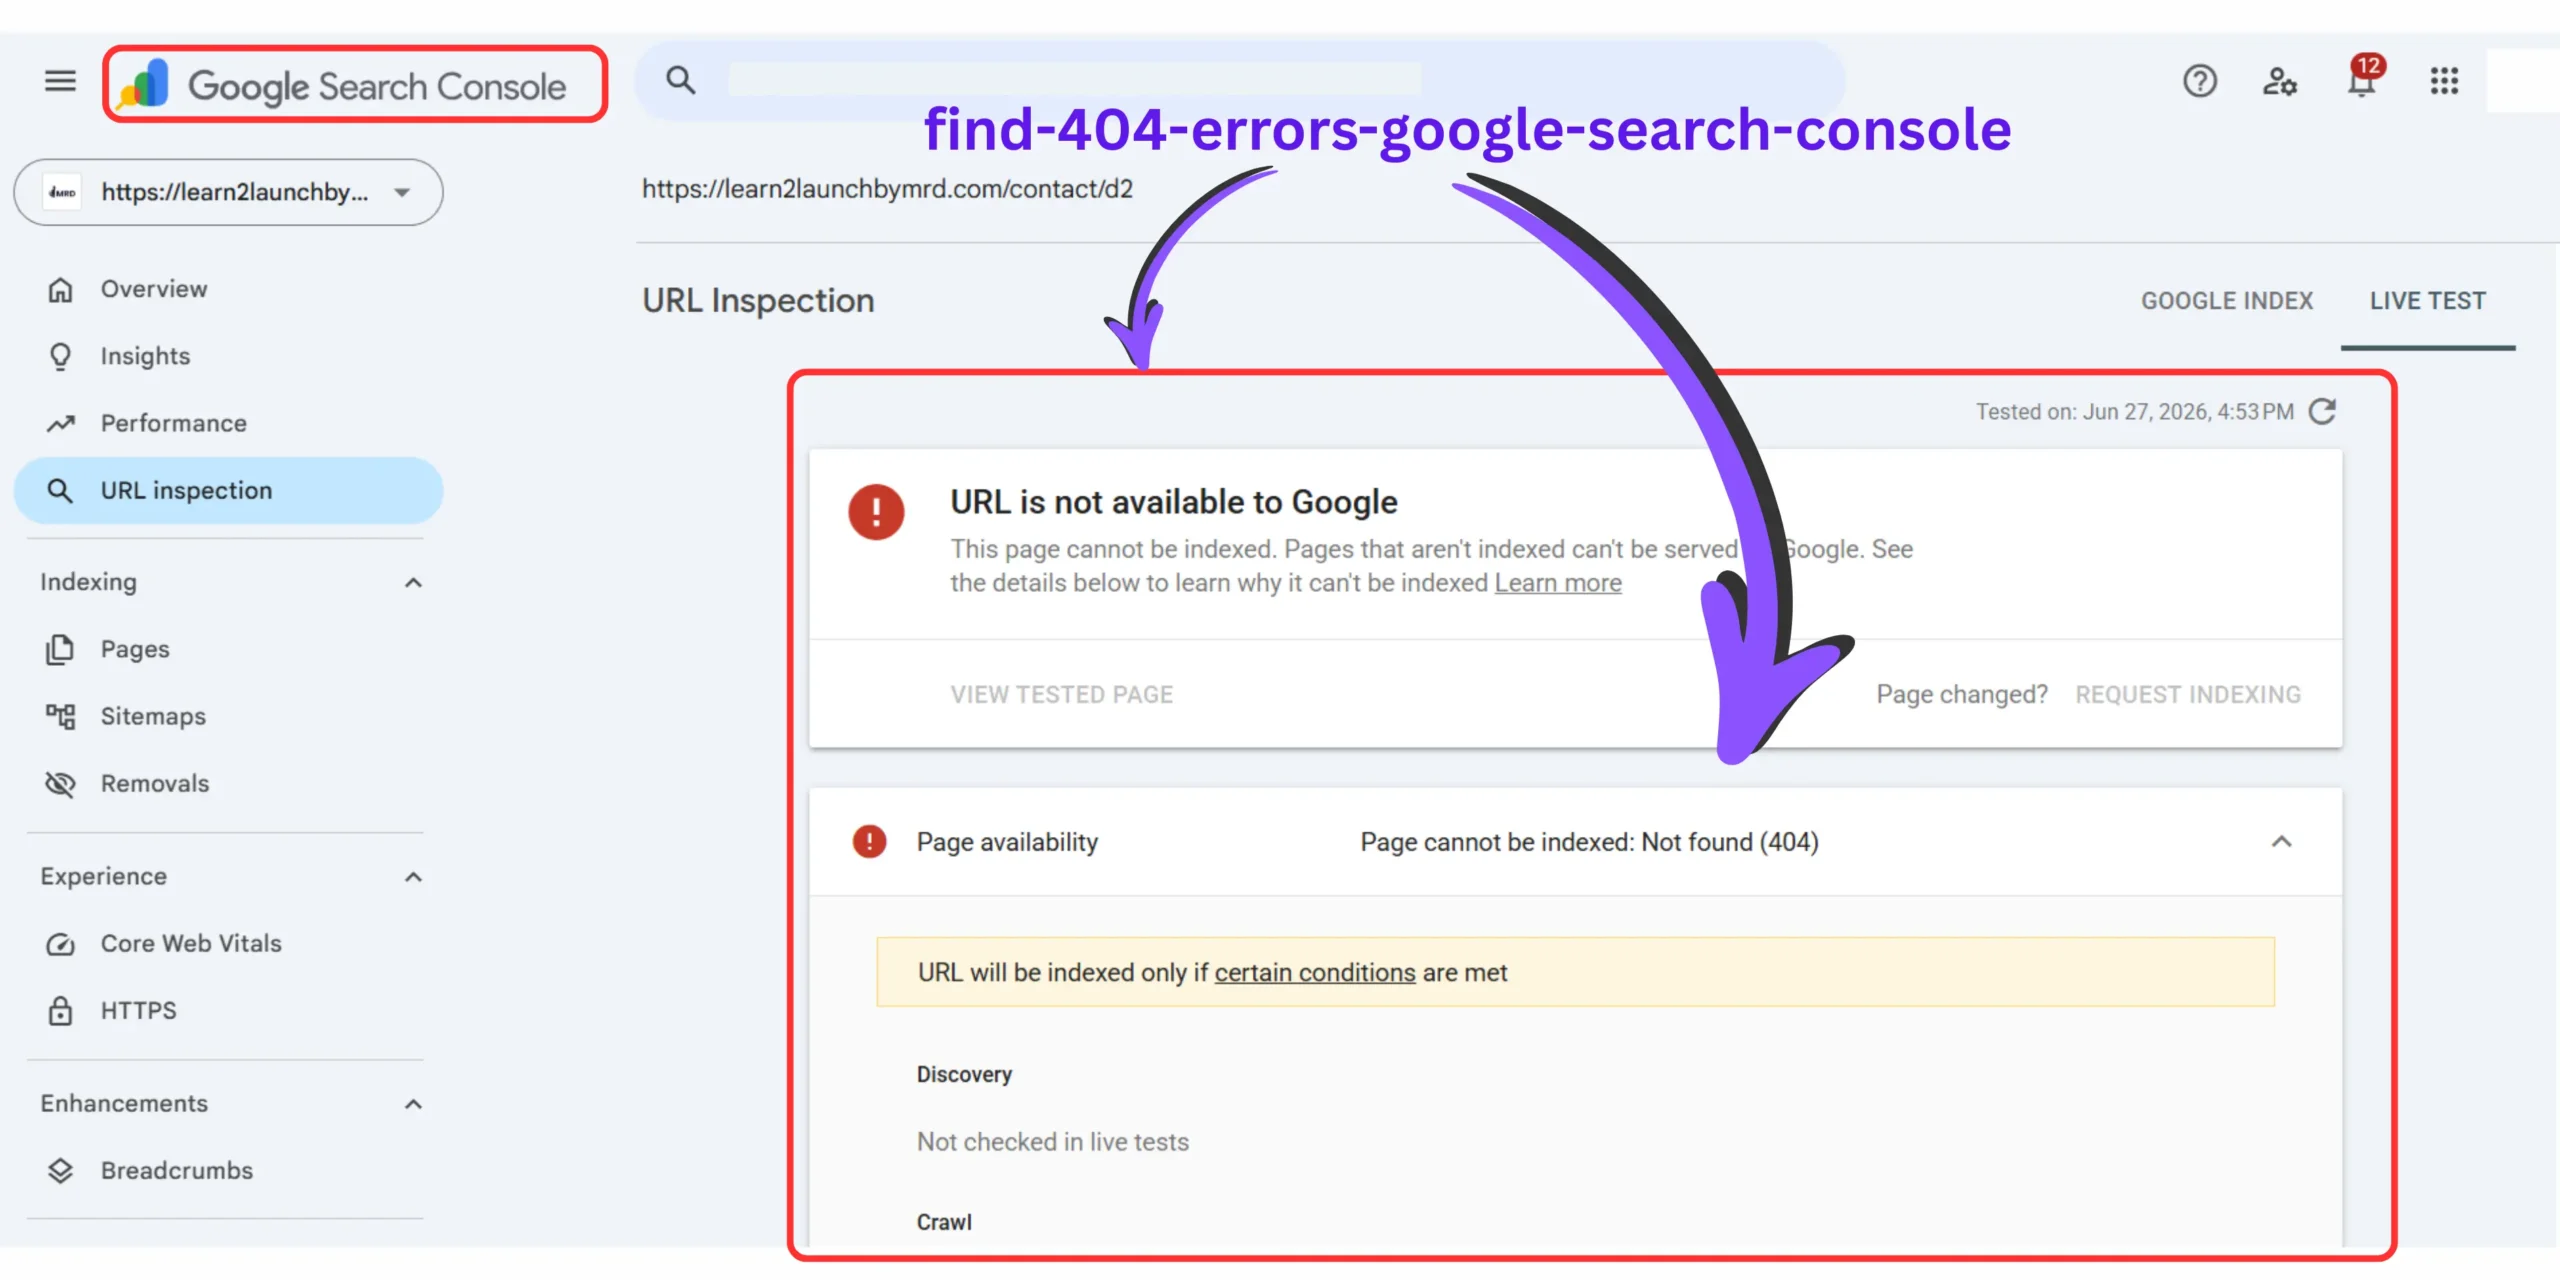
A 404 error after changing a URL usually means the old address is no longer redirecting correctly.
If Google Search Console reports unexpected 404 errors:
- Confirm that your 301 redirect is still active.
- Test the old URL in a browser to ensure it redirects to the new page.
- Update any remaining internal links that still point to the old URL.
- Request Google to recrawl the affected pages after fixing the issue.
Once the redirect is functioning correctly, Google will typically replace the old URL with the new one during future crawls.
How long does it take Google to index a changed URL?
Google typically takes anywhere from a few days to several weeks to discover, process, and index a changed URL. The exact timeline depends on how often Google crawls your website, whether your 301 redirect is configured correctly, and how quickly Google processes the new page.
If you’ve created a proper 301 redirect, updated your internal links, and requested indexing in Google Search Console, Google will usually begin processing the change during its next crawl. While rankings may fluctuate temporarily, they often stabilize once Google fully understands that the old URL has permanently moved to the new one.
When I first started working with WordPress, I assumed changing a URL was an instant process. After updating several published URLs, I checked Google the next day expecting everything to be normal. Instead, some pages temporarily disappeared from search results while Google processed the redirects
That experience taught me an important lesson: changing a URL is only the first step—Google still needs time to crawl, understand, and trust the new page before rankings settle again.
If you’re still building a new website, it’s also helpful to understand how Google normally discovers fresh content. Read How to optimize blog posts for SEO beginners to learn what influences indexing speed and how to build a stronger SEO foundation.
How long different websites usually take
Websites with higher authority and frequent crawling are usually indexed faster than brand-new websites. Although every website is different, the following timeline reflects what many site owners commonly experience.
| Website type | Typical discovery time | Typical ranking update |
| High-authority websites (frequently crawled) | 1-3 days | About 1 week |
| Established blogs | 3-7 days | 1-2 weeks |
| New or low-authority blogs | 1-3 weeks | 2-6 weeks |
These are typical timeframes rather than guaranteed deadlines. Google may process some URL changes much faster, while others can take longer depending on crawl frequency and the overall health of your website.
How to help Google process a changed URL faster
You cannot force Google to index a changed URL immediately, but you can make it easier for Google to discover the update. After changing a URL:
- Make sure the old URL returns a 301 permanent redirect.
- Update all internal links to point directly to the new URL.
- Submit the new URL through the Google Search Console URL Inspection tool.
- Ensure your XML sitemap includes the updated URL.
- Keep the page accessible so Google can crawl it successfully.
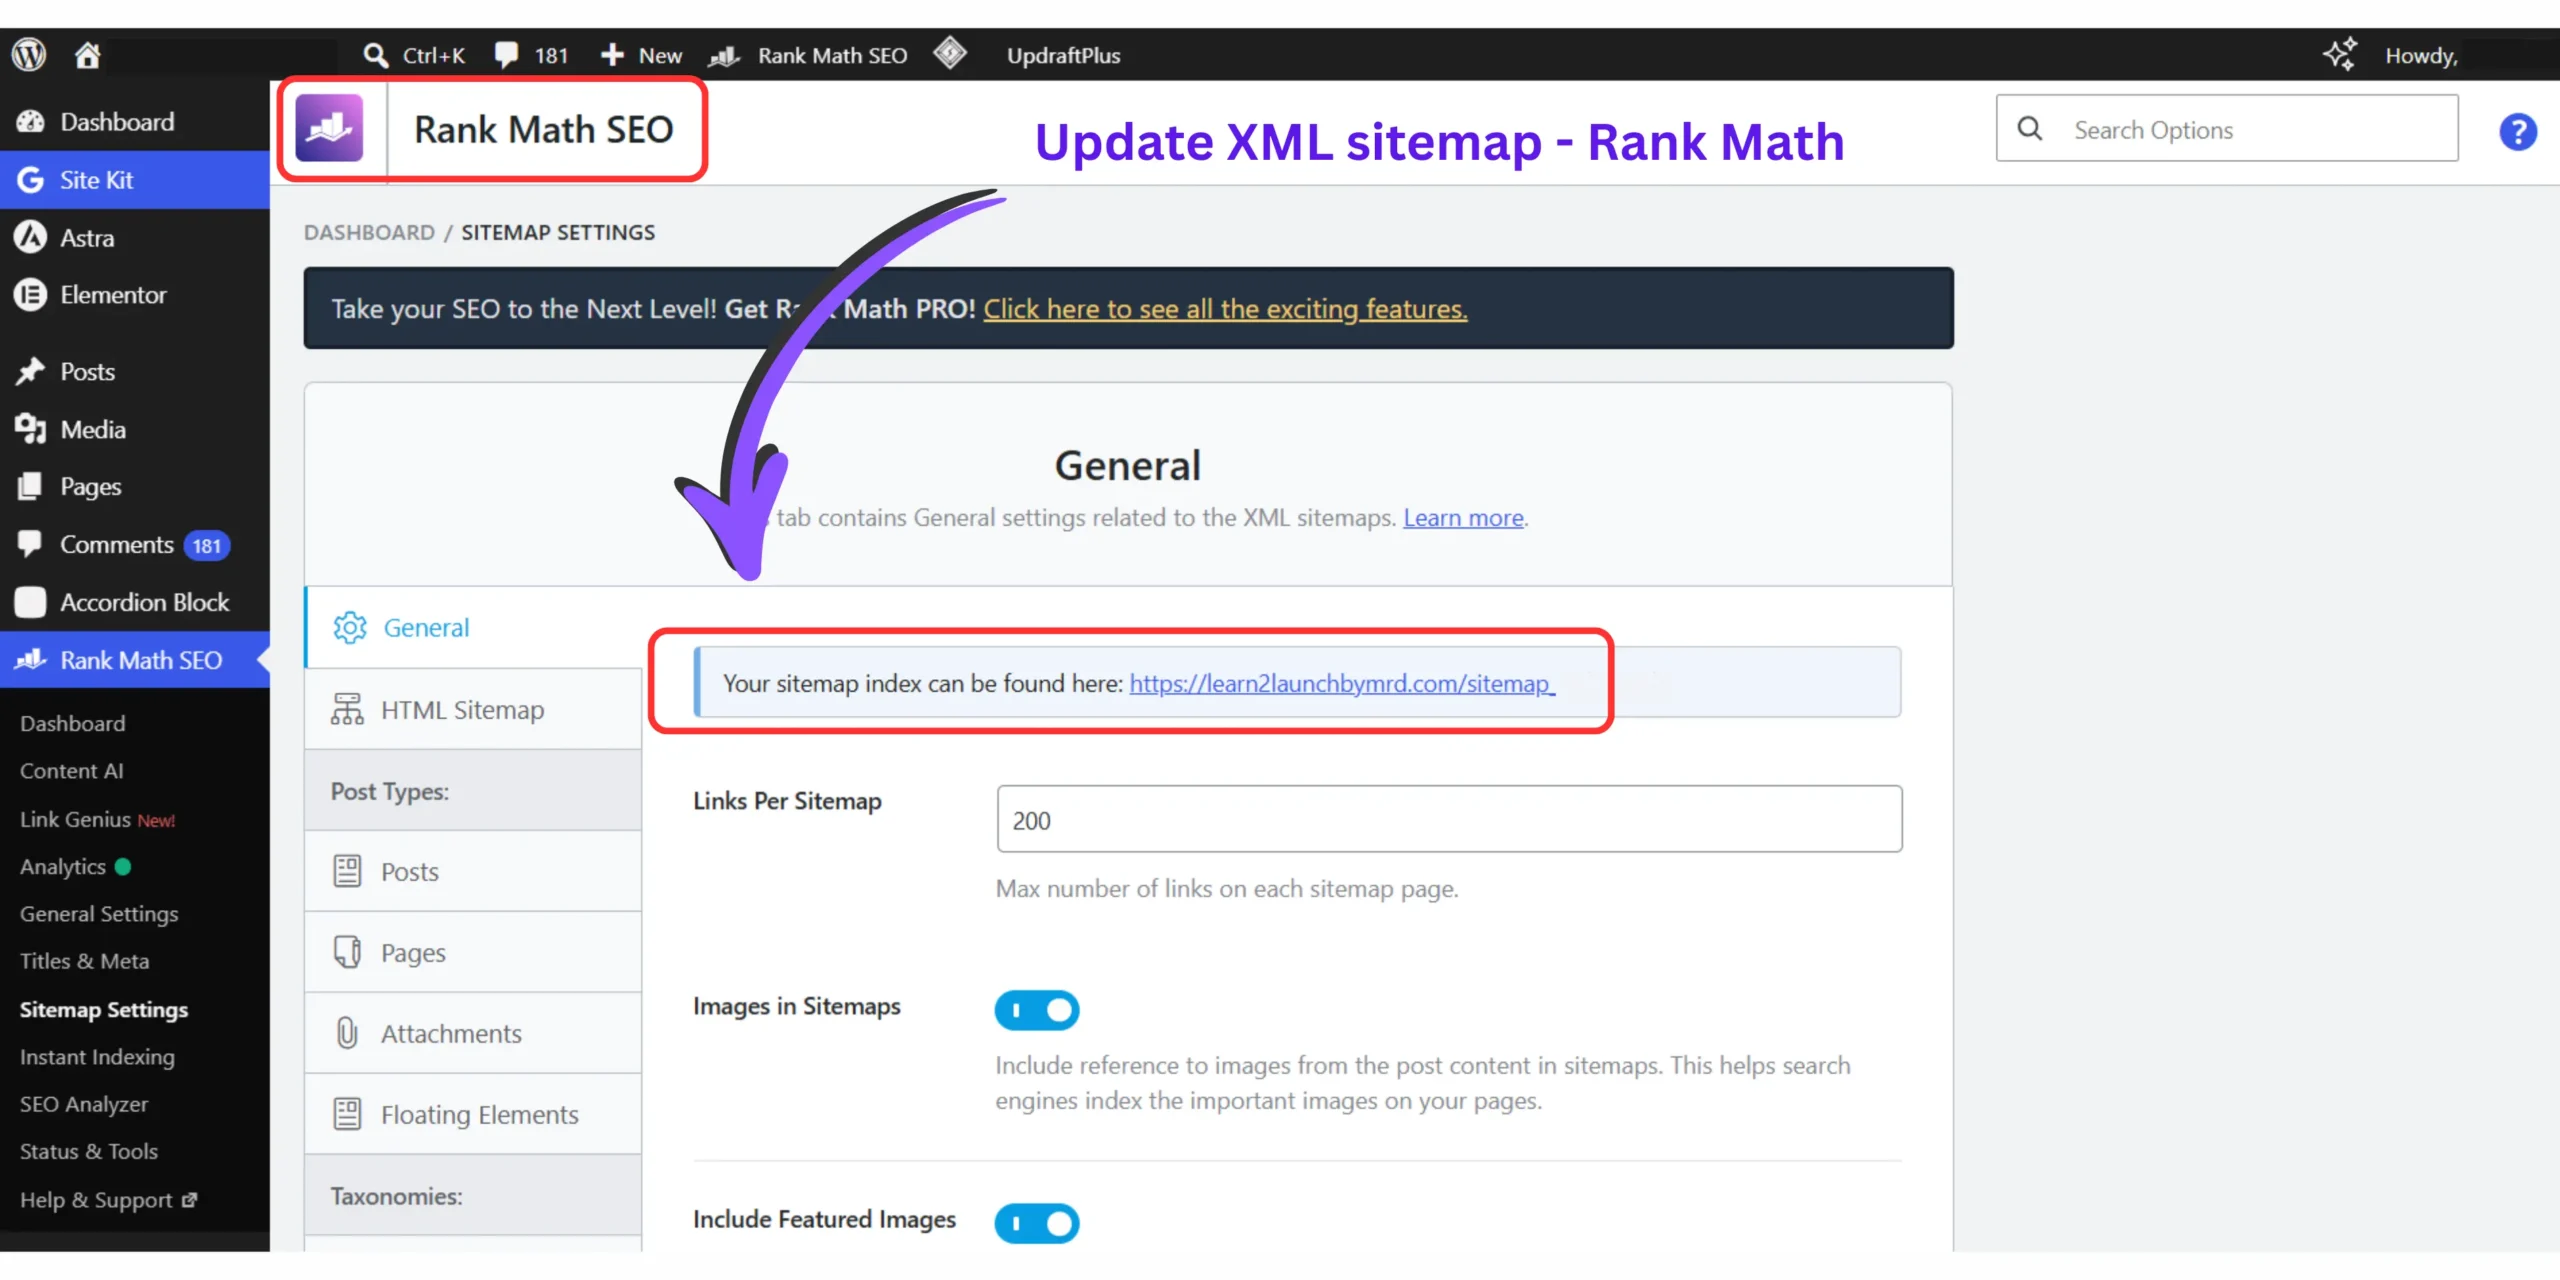
These steps won’t guarantee instant indexing, but they help Google discover and process your URL change as efficiently as possible.
Frequently asked questions on how to change WordPress URL without losing rankings.
What happens if I change a blog post URL in WordPress?
Changing a published WordPress URL without creating a 301 redirect can lead to broken links, temporary ranking fluctuations, and 404 errors for visitors using the old URL.
Search engines treat every URL as a unique page. When you change a permalink, Google needs to discover the new address and understand that it permanently replaces the old one. A 301 redirect helps preserve existing ranking signals while automatically sending both users and search engines to the updated URL.
Does changing a URL always lose SEO traffic?
No. Changing a URL does not automatically cause permanent traffic loss if you create a 301 redirect and allow Google time to process the change.
A properly configured 301 redirect helps Google transfer most of the page’s existing ranking signals to the new URL. While rankings may fluctuate temporarily during reindexing, they often stabilize once Google completes the migration.
How do I change a post URL without creating 404 errors?
Create a permanent 301 redirect immediately after changing the URL and confirm that the old address redirects to the new page.
After updating the permalink, create a 301 redirect using a plugin such as Rank Math or Redirection. Then test the old URL in a browser and update any important internal links so visitors always reach the correct destination.
Why should I manually update internal links if my 301 redirect is working?
Updating internal links helps users and search engines reach the new URL directly without relying on a redirect.
Although a 301 redirect works correctly, linking directly to the final URL creates a cleaner site structure, improves crawl efficiency, and makes your website easier to manage as your content grows.
How long does it take Google to index a newly changed URL?
Google typically takes anywhere from a few days to several weeks to discover, process, and index a changed URL.
The exact timeline depends on how often Google crawls your website and whether your redirect is configured correctly. You can help speed up the process by submitting the new URL through Google Search Console and keeping your XML sitemap up to date.
My advice to protect your rankings
Yes, you can change a WordPress URL without losing rankings if you implement a proper 301 redirect, update your internal links, and monitor the change in Google Search Console.
Most ranking issues occur when the old URL is removed without a redirect or when search engines are not given a clear path to the new destination.
Mastering how to change WordPress URL without losing rankings is less about the URL change itself and more about managing the transition correctly. When changing blog post URL after publishing WordPress, your goal is to help both users and search engines understand that the content has moved permanently rather than disappeared.
Before publishing your updated URL, remember these three essentials:
- Create a 301 permanent redirect from the old URL to the new URL.
- Update internal links so they point directly to the new destination.
- Verify the redirect and indexing status in Google Search Console.
Think of a URL as a permanent address for your content. If that address changes, search engines need a clear route to follow. By using redirects correctly and keeping your internal link structure updated, you can preserve rankings, maintain a better user experience, and help Google process the change more efficiently.
MY RECOMMENDATION :
The safest way to change a WordPress URL is to create a 301 redirect immediately after updating the permalink and then verify the change in Google Search Console. While WordPress may help handle some permalink changes, a dedicated redirect strategy provides greater control, improves reliability, and reduces the risk of broken links or indexing issues.